
|
Vmax Group Ltd
|

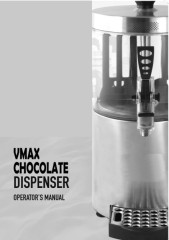
Hot Chocolate Maker Instructions
| Place of Origin: | Zhejiang, China (Mainland) |
|
|
|
| Add to My Favorites | |
| HiSupplier Escrow |
Product Detail
5L Hot Chocolate Maker Instructions Manual
and 3L Hot Chocolate Dispenser Instructions Manual
Let you know how to use Hot Chocolate Dispenser
5L Hot Chocolate Maker Instructions Manual
Hot Chocolate Dispenser Instruction Manual
HC01 and HC02 Hot Chocolate Dispenser Instructons Manual

Temperature control for Hot Chocolate Dispenser
How to assemble Hot chocolate Dispenser
Assemble tap for Hot chocolate maker
and 3L Hot Chocolate Dispenser Instructions Manual
Let you know how to use Hot Chocolate Dispenser
Hot Chocolate Dispenser Instruction Manual
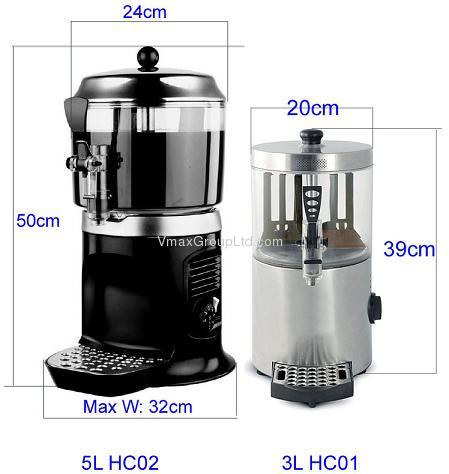
| 1.0 : TECHNICAL CHARACTERISTICS | ||
| Base: | Stainless Steel Casing Or Chrome Plastic | |
| Bowl: | Food-grade shock-proof polycarbonate removable bowl | |
| Capacity: | 5 or 3 Litres | |
| Dimensions: | Diameter 240mm(5L); 200mm(3L) Height 500mm(5L); 400mm(3L) | |
| Weight when Empty: | 5kgs and 3 kgs | |
| Weight when Full: | 10kgs and 6 kgs | |
| Adjustable thermostats: | Two | |
| Noise Level: | Lower than 70 dB | |
| Electrical Specifications: | Please read the information on the data plate located on the underside of each dispenser. | |
HC01 and HC02 Hot Chocolate Dispenser Instructons Manual
| 2.0 : INTRODUCTION | ||
Please read this instruction manual carefully before operating the dispenser. As with all mechanical products, this unit requires careful cleaning and maintenance. | ||
HOT CHOCOLATE DISPENSER PREPARATION INSTRUCTIONS: To speed up preparation time preheat 2 litres of milk to around 60°C. Add to your Hot Chocolate Dispenser, (Set at 65°C your product should be ready in 10 or so minutes). When at temperature it is advisable to rotate 2 - 3 cups of product through the tap and return to the mixing bowl. This should also be done occasionally through slow periods. Makes 3 litres, (30 serves) Over time / due to evaporation you will need to add milk. VISCOSITY TEST: Use a 250ml cup to test and maintain correct viscosity, hot pour time should be 7 seconds from the time product hits the bottom of the cup till it is full, tap must be fully open and clear. Simply add more milk if the product is too thick. It is advisable to ensure unused product is at correct viscosity before refrigerating in the dispenser bowl overnight, (at refrigeration temperatures heavy product could cause tap blockages). NEVER RUN OUT: We recommend cold mixing a fresh batch of product and storing refrigerated ready to add to the dispenser during serving hours, (this way you will never run out of product, and further increase your sales). SERVING SUGGESTIONS: Serve 100ml as a sipping chocolate with a small dollop of cream and biscotti. As an alternative try, adding to cold milk and ice, over ice-cream, add to coffee mocha, also mixes very well with nut based liqueurs. NOTE: YOUR HOT CHOCOLATE DISPENSER IS NOT DESIGNED AS A BLENDER; IT IS INTENDED AS A STIRRER / STORAGE APPLIANCE. |
| 3.0 : INSTALLATION | ||
| (i) | Remove the dispenser from the packaging. (This should be retained in case the dispenser needs to be returned). | |
| (ii) | Check the dispenser has not been damaged during transport. | |
| (iii) | The dispenser does not leave the factory in a sanitized condition. Prior to use it must be disassembled, cleaned and sanitized according to the instructions in chapter 5.3 CLEANING. | |
| (iv) | Install the dispenser on a counter top that will support its weight, even with a full load. | |
| (v) | Before connecting the dispenser electrically, check that the mains voltage is as shown on the data plate. Plug the unit into an earthed, single phase electrical supply. | |
| 4.0 : DESCRIPTION OF CONTROLS | ||
| The dispenser is equipped with a general power switch whose functions are: | ||
| Position 0 | Power is turned OFF | |
| Position 1 | Heater and stirrer are turned ON | |
| The dispenser is equipped with a primary thermostat, on the right side, to adjust the temperature of the product. When the light on the power switch is illuminated, that means the heater is on. When the light goes off, it means the product has reached the desired temperature. | ||
| Power switch and primary thermostat. | ||
Temperature control for Hot Chocolate Dispenser
| 5.0 : OPERATING PROCEDURES | ||
| (i) | Prior to use, ensure the dispenser has been cleaned and sanitized following the instructions in section 5.3 CLEANING, and properly reassembled. | |
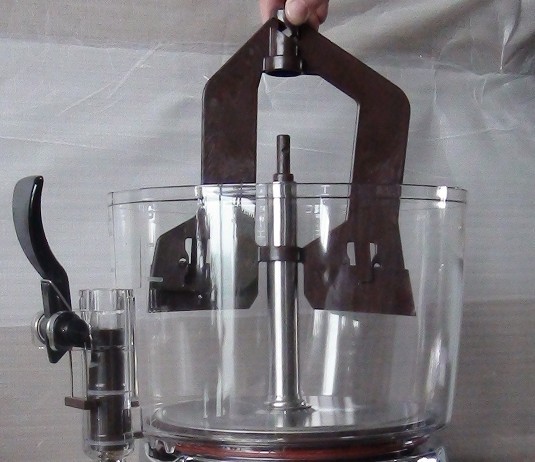
| (ii) | Fit the stirrer, carefully twisting anti-clockwise until it is properly located on the bayonet fitting as far down as it can go. See Figure 2. | |
| (iii) | Pour the required quantity of milk into the bowl and then add the correct amount of chocolate according to the recipe provided separately. | |
| (iv) | Put the lid back on to the bowl making sure that it is fitted correctly. | |
| (v) | Adjust the aroma vents as required.(for 3L dispenser) | |
| (vi) | Set the primary thermostat as required and then switch on the power. | |
| (vii) | Wait until the entire batch is a consistent smooth brown colour and condensation is visible in the bowl before dispensing. | |
| (viii) | The dispenser should always be operated with the lid in place in order to prevent possible contamination of the product. | |
| (ix) | While in use, the dispenser should always be left switched on; the heaters are thermostatically controlled and will bring the product up to the required temperature and then maintain it at that temperature automatically. The stirrer will continue to operate at all times. | |
| (x) | Topping Up - If your batch is running out during the day, you can easily top it up without waiting for it to run out completely. Switch off the dispenser temporarily. Add more product as required. Switch the dispenser back on. Wait until the batch is back up to temperature. Then dispense as normal. | |
How to assemble Hot chocolate Dispenser
| 5.1 : OPERATION: HELPFUL HINTS | ||
| Pre-Warming If you want to speed up the batch preparation time, you can pre-warm the product in a microwave, taking care not to let it get above 60ºc. Then pour the blended concentrate and milk into the dispenser and continue as normal. |
| 5.2 : FOR SAFE OPERATION | ||
| (i) | Read the instruction booklet before using the dispenser. | |
| (ii) | Use the dispenser only if it is earthed correctly. | |
| (iii) | Do not use extension cords to connect the dispenser electrically. | |
| (iv) | Do not remove the bowl when the unit is in operation. | |
| (v) | Adjust the aroma vents as required. | |
| (vi) | Do not open the dispenser for cleaning or maintenance without ensuring it has been disconnected from the electricity. | |
| WARNING: | ||
| DO NOT start the machine while the bowl is empty. | ||
| DO NOT start the machine without a liquid in the bowl. | ||
| DO NOT remove the bowl until the hot plate is cold. | ||
| DO NOT remove the bowl from the base when it contains hot products. | ||
| IMPORTANT: | ||
| Place the unit on a horizontal surface. | ||
| 5.3 : CLEANING AND SANITIZING PROCEDURES | ||
Cleaning and sanitizing are essential to prevent bacterial contamination and to maintain perfect taste and maximum efficiency from your dispenser. The procedures described below are general. Any residual product must be taken out of the dispenser before it is disassembled for cleaning. |
| 5.3.1 : DISASSEMBLY INSTRUCTIONS | ||
| Before proceeding to disassemble any component, always disconnect the dispenser from the power source by unplugging it. | ||
| (i) | Remove the lid. If the lid requires cleaning, unscrew the handle and remove the aroma vents disc, taking care not to lose the screw. | |
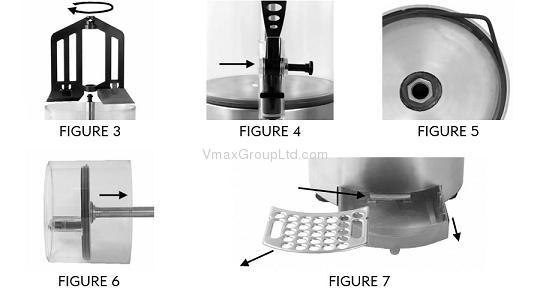
| (ii) | Remove the stirrer from the central shaft by twisting it clockwise (see Figure 3). | |
| (iii) | Lift the bowl off the dispenser base. | |
| (iv) | Dismantle the tap by pulling out the pin (see Figure 4). | |
| (v) | Remove the base from the bowl by removing the rubber ring (see Figure 5) and tapping the base out in the direction shown (see Figure 6). | |
| (vi) | Remove the drip-tray plate and then remove the drip tray as shown in Figure 7. | |
| 5.3.2 : CLEANING INSTRUCTIONS | ||
| Before cleaning, disconnect the dispenser from the power source by unplugging it and disassemble the unit as described earlier. | ||
| (i) | Place the bowl, stirrer, aroma vents disc and tap components in a dishwasher, taking care not to lose any of the components, OR | |
| (ii) | Use a suitable brush and carefully clean all the above mentioned parts in a bowl containing hot water and a detergent, taking care to thoroughly rinse the parts after washing. | |
| 5.3.3 : ASSEMBLY INSTRUCTIONS | ||
| Before cleaning, disconnect the dispenser from the power source by unplugging it and disassemble the unit as described earlier. | ||
| (i) | To refit the base into the bowl, simply push the base firmly back into the bottom of the bowl and carefully push the rubber ring back into place section by section. | |
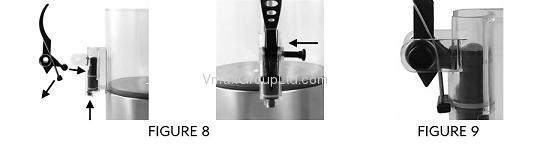
| (ii) | Reassemble the tap mechanism (see Figure 8 and Figure 9). | |
Assemble tap for Hot chocolate maker
| 6.0 : MAINTENANCE | ||
| Before cleaning, disconnect the dispenser from the power source by unplugging it and disassemble the unit as described earlier. | ||
| (i) | Daily: Check the dispenser for any leaks from the tap. If there are any, first check the tap mechanism is correctly assembled. If the leak continues, check the rubber "O" rings on the piston and if they are worn, they must be replaced with original parts. | |
| (ii) | Use a suitable brush and carefully clean all the above mentioned parts in a bowl containing hot water and a detergent, taking care to thoroughly rinse the parts after washing. | |
Welcome to Purchase Vmax Hot Chocolate Dispenser
Didn't find what you're looking for?
Post Buying Lead or contact
HiSupplier Customer Service Center
for help!
Related Search
Find more related products in following catalogs on Hisupplier.com
Company Info
Vmax Group Ltd [China (Mainland)]
Business Type:Manufacturer, Trading Company, Distributor/Wholesaler
City: Ningbo
Province/State: Zhejiang
Country/Region: China (Mainland)
You May Like:
Product (624)
- Hot Chocolate Dispenser (34)
- Chocolate Fountain (92)
- Electric Stove (31)
- Kitchen Appliances (170)
- Commercial Food Machine (86)
- Household Cleaners (46)
- As Seen On TV Products (96)
- Hair Dryer (9)
- Electric Iron (7)
- Electric Blender (1)
- Vacuum Food Saver (16)
- Household Appliances (9)
- Disposable Razors (3)
- Iphone Parts (1)
- Electric Heater (3)
- Wall Fabric (8)
- Scarf (10)
- Others (2)
